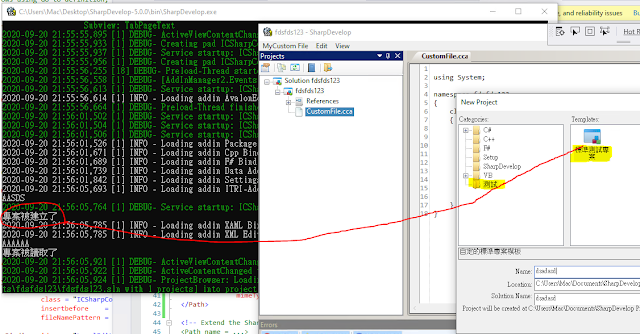
SharpDevelop 大多是由 AddIns 外掛機制構成的 IDE , AddIns 在 SharpDevelop 也有幾種方式呈現,前幾章所介紹的 AddIns 是屬於 Misc - 被動呼叫執行的外掛,這個章節要介紹 Language Binding 的外掛,它是主動執行的外掛,會在程式一載入的時候就被呼叫到系統中,通常, Language Binding 是用來支援 IDE 跑新的程式語言用的,不過,我們還是可以拿來做其他延伸的應用。
因為這個主題將有點多,所以會先列個大綱,我們要做到這幾個效果:
- 在新增檔案視窗,可以選擇我們自訂的 Project 檔 (.customproj)
- 自訂專案模板 (.xpt),而且程式語言可以選擇我們自訂的 (CustomLang)
- 打開特定的檔案名稱 (.cca) ,會開啟我們自定的 Form View
關於 Language Binding 相關參考資源
- SharpDevelop 目錄的 doc
- Dissecting a C# Application Inside SharpDevelop: 閱讀這個 PDF 書的第 18 章 (也就是 SharpDevelop 的 Language Binding 部分),第 18 章並沒有出版,但是網路上可以找到:
這篇文章 [SharpDevelop-Chap18:Language Bindings] 有提供 [載點],這本書全部都是提到 SharpDevelop ,有興趣了解也可以翻翻看。
Backend Binding - 預先載入外掛
要將這個外掛綁定在核心中,在打開檔案的同時才會偵測副檔名有沒有符合這個外掛描述檔的副檔名觸發器,故需要先設定為 preinstall 屬性。
.addin 檔案:
<AddIn name        = "ICXAL Binding"
       author      = "You"
       addInManagerHidden = "preinstalled">
在這邊要預先設定 addInManagerHidden ,自動在開啟 SharpDevelop 時讀取。Project Binding - 定義專案檔
Language Binding
我們要自創一個自己的語言 Binding,給定語言的 ID 叫做 CustomLang ,使得之後新增專案時,可以偵測到這個 Language:
<Path name="/SharpDevelop/Workbench/LanguageBindings">
    <LanguageBinding
			id="CustomLang"
			extensions=".custom" />
  </Path>
在等一下要新增的 .xpt 裡面,裡面有要求你要指定語言,這時候那個語言指定就是 CustomLang; 一般的 LanguageBinding 其實有 class 可以去跑觸發事件的 class handler,不過這裡只是要當作與 csharp 不同的語言去區分專案,故沒有做,有興趣可以去看上面推薦的 PDF 文件。
Project Binding
專案設定檔,是告訴 SharpDevelop ,如果打開該類型的專案檔,要先執行什麼初始化步驟 (class handler)。
<!-- Project (Create New Solution / Open Solution Default Handler)-->
<Path path = "/SharpDevelop/Workbench/ProjectBindings">
  <ProjectBinding id                   = "CustomLang"
		  guid                 = "{FAE04EC0-3066-11D3-BF1A-00C04F79EFBC}"
		  supportedextensions  = ".custom"
		  projectfileextension = ".customproj"
		  class                = "ITRI___AddIn1.ProjectBinding.CustomProjectBinding" />
</Path>
*注意上面的 class 要綁定到下面我們新增的 CustomProjectBinding 的 class path。
然後,這個 Project 會在 .customproj 一被打開時,執行 class 觸發,我們就直接在觸發時丟一個 Hello World 就好,畢竟我們的專案並不需要初始化什麼內容。
在專案底下先新增一個 CustomProject.cs:
using ICSharpCode.SharpDevelop.Project;
using System;
using System.Collections.Generic;
using System.Linq;
using System.Text;
using System.Threading.Tasks;

namespace ITRI___AddIn1.ProjectBinding
{
	public class CustomProject : CompilableProject
	{
		public CustomProject(ProjectLoadInformation info) : base(info)
		{
			Console.WriteLine("專案被讀取了");
		}

		public CustomProject(ProjectCreateInformation info) : base(info)
		{
			Console.WriteLine("專案被建立了");
		}

		public override string Language
		{
			get
			{
				return "CustomLang";
			}
		}

		protected override ProjectBehavior CreateDefaultBehavior()
		{
			return new CustomProjectBehavior(this, base.CreateDefaultBehavior());
		}

		public void DisableWatcher()
		{
			watcher.Disable();
		}

		public void EnableWatcher()
		{
			watcher.Enable();
		}
	}

	public class CustomProjectBehavior : ProjectBehavior
	{
		public CustomProjectBehavior(CustomProject project, ProjectBehavior next = null)
			: base(project, next)
		{
                        //預設要執行的行為
		}

		public override ItemType GetDefaultItemType(string fileName)
		{
			return base.GetDefaultItemType(fileName);
		}
	}
}
然後,要多一個 ProjectBinding 的 class handler 去接收事件,啟動上面這個 class,開新的程式,叫做 CustomProjectBinding.cs:
using ICSharpCode.SharpDevelop.Project;
using System;
using System.Collections.Generic;
using System.Linq;
using System.Text;
using System.Threading.Tasks;

namespace ITRI___AddIn1.ProjectBinding
{
	public class CustomProjectBinding : IProjectBinding
	{
		public const string LanguageName = "CustomLang";

		public string Language
		{
			get
			{
				return LanguageName;
			}
		}

		public IProject LoadProject(ProjectLoadInformation loadInformation)
		{
			//普通載入先前的 Project
			return new CustomProject(loadInformation); //呼叫剛才的 CustomProject 執行預設行為
		}

		public IProject CreateProject(ProjectCreateInformation info)
		{
			//新建立的 Project
			return new CustomProject(info);
		}

		public bool HandlingMissingProject
		{
			get
			{
				return false;
			}
		}
	}
}
等一下把下面幾個弄好,我們再測試看看。
File Filter
專案過濾器,告訴 SharpDevelop 這個類型的專案,檔案副檔名是什麼 (純設定而已)。
<Path name = "/SharpDevelop/Workbench/Combine/FileFilter">
  <FileFilter id        = "SharpDevelopLanguageBindingProject"
              insertbefore="AllFiles"
              name       = "Project Combine"
              class      = "ICSharpCode.SharpDevelop.Project.LoadProject"
              extensions = "*.customproj"/>
</Path>
專案檔識別過濾器
可以讓 SharpDevelop 讀取檔案時,去偵測這個類型的檔案還有它的 mime type:
  <Path name = "/SharpDevelop/Workbench/FileFilter">
    <FileFilter id = "CustomLangFilter"
		            insertbefore="AllFiles"
		            name = "Custom files (*.custom)"
		            extensions = "*.custom"
		            mimeType = "text/xml"/>
  </Path>
製作專案模板
這個專案模板是要給 IDE 在 New Project 的時候,可以看到哪些 Template , 在 SharpDevelop 的專案模板是 xpt,跟 Visual Studio 專案模板也很像 (叫 .vstemplate)。
我們在這裡新增一個純專案的模板 StandardProject.xpt:
<?xml version="1.0"?>
<Template originator = "Mac Taylor">

	<!-- Template Header -->
	<TemplateConfiguration>
		<Name>標準測試專案</Name>
		<Category>測試</Category>
		<Icon>Icons.32x32.CombineIcon</Icon>
		<Description>自定的標準專案模板</Description>
	</TemplateConfiguration>

	<!-- Actions -->
	<Actions>
		<Open filename = "CustomFile.cca"/>
	</Actions>

	<!-- Template Content -->
	<Project language = "CustomLang">
		<ProjectItems>
			<Reference Include="System" />
			<Reference Include="System.Data" />
			<Reference Include="System.Xml" />
		</ProjectItems>

		<Files>
			<File name="CustomFile.cca"><![CDATA[
using System;

namespace ${StandardNamespace}
{
	class Program
	{
		public static void Main(string[] args)
		{
			Console.WriteLine("Hello World!");

			// TODO: Implement Functionality Here

			Console.Write("Press any key to continue . . . ");
			Console.ReadKey(true);
		}
	}
}]]></File>
		</Files>
	</Project>
</Template>
我們在上面隨便開了一個 .cca 的副檔名,當作某個編輯器的格式。
現在,儲存 .xpt 到這個位置: C:\Users\Mac\Desktop\SharpDevelop-5.0.0\data\templates\project\任意資料夾
之後在開新專案就會看到這個模板了。
Display Binding - 特定的副檔名開啟特定程式
以上完成後,最後我們希望打開 .cca 這個檔案的時候,可以打開我們指定的 UserControl Form 應用程式,該如何做?
首先,要先新增 DisplayBinding 事件呼叫的 class handler,叫做 CustomDisplayBinding.cs:
using ICSharpCode.Core;
using ICSharpCode.SharpDevelop.Gui;
using ICSharpCode.SharpDevelop.Workbench;
using System;
using System.Collections.Generic;
using System.IO;
using System.Linq;
using System.Text;
using System.Threading.Tasks;

namespace ITRI___AddIn1
{
	class CustomDisplayBinding : IDisplayBinding
	{
		public bool CanCreateContentForFile(FileName fileName)
		{
			return true; // definition in .addin does extension-based filtering
		}

		public IViewContent CreateContentForFile(OpenedFile file)
		{
			Console.WriteLine("Activate Page");
			Console.WriteLine(file.FileName.GetFileName());
			WorkbenchSingleton.Workbench.ShowView(new Class1()); //顯示剛才的 View 視圖
			return null;
		}

		public bool IsPreferredBindingForFile(FileName fileName)
		{
			return true;
		}

		public double AutoDetectFileContent(FileName fileName, Stream fileContent, string detectedMimeType)
		{
			return 1;
		}
	}
}
我直接在程式碼裡面呼叫前幾章外掛章節所提到的 View Class,透過 SharpDevelop View Class (AbstractViewContent) 再去呼叫 new UserControl1() 這個視圖。
繼續再 .addin 檔案中,增加一個 Display Binding, Display Binding 就是針對檔名,開啟對應的應用程式或 Editor 給使用者:
<Path name = "/SharpDevelop/Workbench/DisplayBindings">

    <DisplayBinding  id    = "CustomEditor"
                     title = "Custom Editor"
                     class = "ITRI___AddIn1.CustomDisplayBinding"
                     insertbefore    = "Text"
                     fileNamePattern = "\.cca"/>
</Path>
*注意上面的 class 要指到剛才新增的 CustomDispalyBinding 的 class 路徑。
然後重新 build,再打開程式,打開那個專案的 .cca 副檔名,就會打開剛才那個 new UserControl1() 這個 Form 自定的應用程式:
最後,附上完整的 .addins 檔案:
<AddIn name        = "ITRI-AddIn-ITRI___AddIn1"
       addInManagerHidden = "preinstalled"
       description = "*">

	<Manifest>
    <Identity name="ITRI___AddIn1" />
  </Manifest>

	<Runtime>
		<Import assembly = "ITRI-AddIn.dll"/>
	</Runtime>

  <!-- Project (Create New Solution / Open Solution Default Handler)-->
  <Path path = "/SharpDevelop/Workbench/ProjectBindings">
    <ProjectBinding id                   = "CustomLang"
        guid                 = "{FAE04EC0-3066-11D3-BF1A-00C04F79EFBC}"
        supportedextensions  = ".custom"
        projectfileextension = ".customproj"
        class                = "ITRI___AddIn1.ProjectBinding.CustomProjectBinding" />
  </Path>

  <!-- 檔名過濾器 -->
  <Path name = "/SharpDevelop/Workbench/Combine/FileFilter">
    <FileFilter id        = "SharpDevelopLanguageBindingProject"
                insertbefore="AllFiles"
                name       = "Project Combine"
                class      = "ICSharpCode.SharpDevelop.Project.LoadProject"
                extensions = "*.customproj"/>
  </Path>

  <!-- 新增語言,語言綁定 -->
  <Path name="/SharpDevelop/Workbench/LanguageBindings">
    <LanguageBinding
			id="CustomLang"
			extensions=".custom" />
  </Path>

  <Path name = "/SharpDevelop/Workbench/FileFilter">
    <FileFilter id = "CustomLangFilter"
		            insertbefore="AllFiles"
		            name = "Custom files (*.custom)"
		            extensions = "*.custom"
		            mimeType = "text/xml"/>
  </Path>

  <!-- 副檔名顯示綁定器 -->
  <Path name = "/SharpDevelop/Workbench/DisplayBindings">

    <DisplayBinding  id    = "CustomEditor"
                     title = "Custom Editor"
                     class = "ITRI___AddIn1.CustomDisplayBinding"
                     insertbefore    = "Text"
                     fileNamePattern = "\.cca"/>
  </Path>

	<!-- Extend the SharpDevelop AddIn-Tree like this:
	<Path name = ...>
		<.../>
	</Path>
	-->
  <!-- 之前章節的程式碼,把 MenuCommand 綁定在 Menu 上 -->
  <Path name = "/SharpDevelop/Workbench/MainMenu/View">
    <MenuItem id = "helloworld"
            label = "測試 Menu Command"
            class = "ITRI___AddIn1.MenuCommand"/>
  </Path>
</AddIn>
其中 Class1.cs 是 Empty View (SharpDevelop Template 新增來的),裡面 new 出一個任意的 Win Form UserControl1();


沒有留言:
張貼留言